For starters if you're looking to get QUALITY hand done work there's more to it than just "painting letters on some wood". This will show you the step by step process it takes to produce a quality, long lasting, exterior sign.
A brief history...
Years ago, in the early 80's, vinyl cutters nearly put every sign painter out of business by decreasing the cost and production time that it takes to make a sign. They also made every single store front look the same because lets face it, there's only so much technology can really make, heart and soul not included...
Thankfully there is a rise and awareness amongst people that are seeking out the old school shit because they don't want the same old photoshopped sign, they want their business to stand out amongst the rest of the bland computer generated, generic and mundane store fronts. The key? Hand painted signage. This is where we begin.
The foundation to any good sign, that will last and be able to stand up to the elements day after day year after year is the wood it's painted on. A must is exterior plywood. Yes its more costly that regular ply but any architect will tell you that the most important step to any building is it's foundation. The difference between standard and exterior ply is that not only does it have a stronger glue to keep the plys from separating over time and exposure but it's also been treated to withstand water(to a certain extent). Once you've cut your wood and put the time in to drill, router, and sand the blanks then you can start.
STEP 1: Primer, drying time: 2-3 hours between coats, coats needed: 2
For exterior signs there's a basic three step process that you need to go through. That process starts with primer. I use a water based primer for the simple reason of drying time. It already takes long enough for the rest of the paint to dry in later steps so I speed it up here where I can. An application of two coats is recommended. You can watch the wood soak up the first coat and start to seal it a bit with the second. Also the primer is nice and thick to help seal up any pin holes that might let water in and destroy the signs from the inside out by causing rot or separation of the plys.
DON'T FOGET...front, back and sides all need two coats. In one full work day, lets say working bankers hours, 9-5, you will have one sign done at the end of the day.
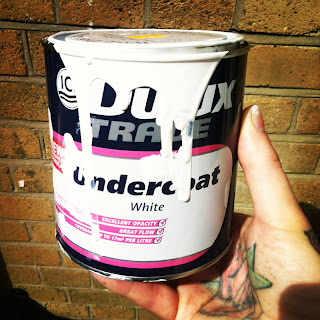
STEP 2: Undercoat, drying time: 6 hours between coats, coats needed: 1
Here's where shit starts to slow up a bit. This is where I start using oil based stuff. The undercoat is important because it seals in the primer and seals out the weather. Also now the wood is smoother in terms of the grain starting to disappear. The last thing you want is a to start painting a sign and have your lettering enamel find every single groove the board has because it's not smooth enough. Luckily only one coat is needed here. DON'T FORGET, front back and sides!!! 12 hours are added here.
STEP 3: Gloss, drying time: 16 hours between coats, coats needed: 2
"Like watching paint dry" comes from this process of steps. I say process because it is, there's a hidden step in here, the one customers don't notice or think of, but this is a QUALITY job so I do it regardless. So apply your gloss, yes, oil based gloss. The standard front back and sides. To get everything sealed nicely and fully coated you NEED two coats of gloss. HIDDEN STEP...in between coats of gloss, if you want a silky smooth and crap free finish, you have to wet sand between coats. You can get away with not sanding but you will have some shit in the paint. Your eye can't see it but your pinstriping or lettering brush will find it. Also smoothing out the finish this much by wet sanding produces a flawless looking mirror finish, like when you paint a car...go ahead and add 64 hours to this step.
STEP 4: Spacing layout
Now that you've taken a week just in preping the signs with paint, for paint, you can finally start the lettering process. In the vinyl world this is done with the single stroke of a key on a computer. In the hand done world this is done with a tape measure, straight edge ruler and a grease pencil. You obviously want to make sure shit lines and matches up, especially when making the same sign more than once...
STEP 5: Letter layout
Once again this is a process that is simplified by a computer and with the stroke of key you can magically have a letter appear on a screen ready to print out. In the hand done world you draw your font and each individual letter you're going to be using. So after you have your letters drawn out and sized proportionately to your spacing layout you can proceed. There's a few ways to do this step, everyone learns differently and every project will teach you something new. The way I do this is by chalking the back of each letter and tracing it onto the sign. By chalking i literally mean take some kids sidewalk chalk and rub it on the back of the paper where you will be tracing. There are faster ways of doing this step like creating a pounce "stencil" of each letter and powdering over the top. The chalking method takes longer but leaves a much more semi-permanent and detailed letter to work from. It obviously comes in handy with heavily detailed letters.
STEP 6: Sign painting
Now is the part we've all been waiting for, the actual lettering of the sign. Most customers think this is what they're paying you for, this step only. Not on my watch, this is step 6! I had to WORK up to this step and rent doesn't pay itself damn it!
So now you can lay your paints on the boards that you've worked so hard on to get to this point, this is when shit starts coming together! Here's a pic of one(of two)signs in process.
STEP 7: Top coat(optional), drying time between coats: 6 hours, coats needed: varies
Not every sign needs this step but with these signs, and most others that I do that are on street level in the city, I do it. Street level is where taggers, high presure side walk cleaners, drunks pissing or puking on shop corners and other potential sign destroyers dwell, so I top coat for these and other reasons. I use an oil based clear coat that seals everything up nicely, like when you flatten an image in photoshop basically. It protects from all sorts and is a sign saver if someone decides to tag over your work. Here is a finished photo of the two 6' tall signs side by side...
For this project the shop I was working for also wanted an overhead sign, 2' tall by about 5' wide. Below is a picture of the signs up at the shop, one of the vertical signs is on the other side of the frame work so you can't see it, but this shows you what I mean by street level. Excuse the photo, it was taken by someone else.
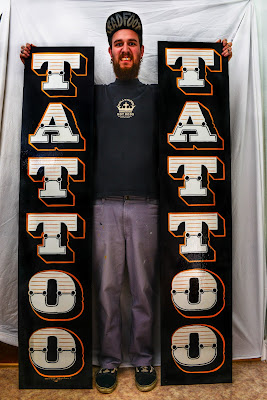
Just a friendly reminder these signs are 6' tall, it's hard to see and grasp the size when you look at them through a computer screen so for a laugh, and to help show the scale, I took a picture with the two vertical signs. I'm 6' 3"...
So as shortened as I could keep it without ditching too much of the detail that is why sign painting is the art that it is. There's a lot of work, forethought, knowhow, time, skill, and preping that go into painting even just one sign. So the next time you see a hand painted sign step back for a second and think about what's gone into creating the piece you're looking at. Many people go to a museum to look at art, all you have to do is have a look around where you're at in the city, you're eye will catch the hand done work, that's one of the things sign painters get paid to do.
If you or someone you know is in the market to get some hand painted signage or pinstriping for their shop, whether it be on the front glass or a piece of wood, feel free to contact me via my website www.vonleadfoot.com or my email vonleadfoot@gmail.com. Prices vary depending on what you might want but budgets are able to be worked within.
A very big thanks to James Killik Photography for helping out last minute!


No comments:
Post a Comment